Creating a roster from just worker patterns (no service plan)
A pattern-based approach is useful in scenarios where you wish for everyone on the roster to work the same overall shift mix, but in staggered rolling week starts. There is a risk that unless the pattern has been built using the 'suggested shift requirement' (see step 4) that the eventual roster will not be able meet minimum staffing requirements across all activities.
🚀 It is best practice for efficiency reasons to add activities at this stage (if known) (see step 8) when using this method. You will also be able to manually assign activities once the roster is built, or make use of the automated 'match activities' algorithm.
The first step is to create the pattern(s) from which the rota will be built:
1. Ensure that all required activities and shift templates have been created
2. In the Patchwork Rota portal, select 'Admin Area' and go to 'Worker Patterns'
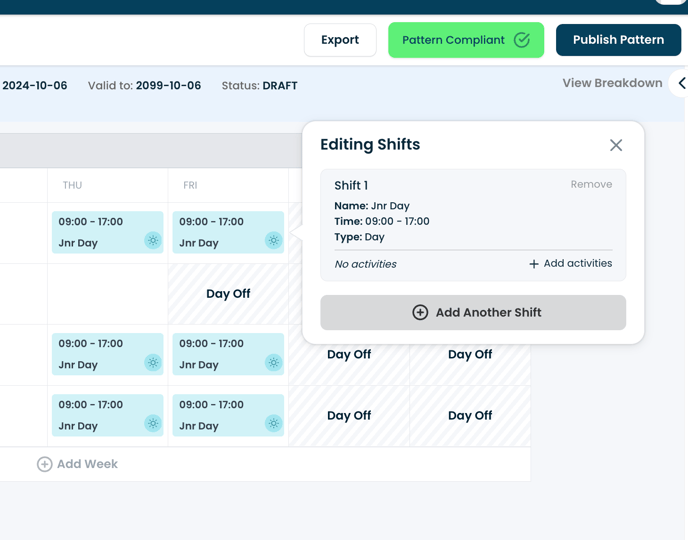
3. Select 'New Pattern' and complete the required fields before selecting 'Create'
4. Add shifts to the template by hovering over a day and selecting 'Add Shift' or add a shift to multiple days by first holding CTRL + M
🚀 Patchwork offers a suggested shift requirement to match your pattern to demand, as laid out in the service plan. Creating a pattern based on the shift requirement will maximise the ability of the roster to meet minimum staffing numbers across all activities.

5. Complete the required fields; 'Select Shift Template'
6. To add more than one shift on the same day (maximum of 3) select 'Add Another Shift'. Please note that for reporting purposes it is best practice to add just one shift per day, with multiple activities (see below)
7. To create a new shift template at this point, select 'Create and Add New Shift Template'
8. Click on a shift and select 'Add Activities' at this stage if required. It is best practice to add activities at this stage
9. Once all shifts have been added, select 'Run Compliance' and then 'View Breakdown'
9.Publish the pattern when ready
💡Extra weeks can be added be added to ('Add Week') or removed from ('X') a pattern
💡When creating a new shift template, ensure you have followed the same naming conventions as your existing shifts to avoid confusion
💡Patterns can be duplicated in the 'Actions' menu of the 'Worker Patterns' screen
Once the pattern(s) have been completed, you can use them to create a roster:
Once created, add staff to the roster by selecting 'Add Worker' and choosing a name from the list (workers are pulled from the associated 'Department List'). Leave worker slots blank by selecting 'Leave Track Unassigned'.
If you have not done so already (see step 8 above), add activities to each shift manually or automate the allocation using the 'match activities' button via the activity view.

Finalise the roster and send to staff by selecting 'Publish Roster'.